Replacing the PC2086 hard drive
Hard drive PC2086s have the drive in a metal cage at the front of the PC. In some PC2086s (in particular, mine), this hard drive is disconnected and just sits there.
Here is how to replace the original drive (if, for example, it's failed or is becoming unreliable, or is just too small) with a SCSI drive.
- Find an 8-bit SCSI controller with a boot ROM. I used a Future Domain TMC-885. You'll also need a 50-pin internal SCSI cable.
- Find a SCSI hard drive with a 50-pin connector. I used a 1G Seagate ST51080N. Unless you're planning to have other SCSI peripherals as well (such as a CDROM drive) make sure the drive is terminated.
- You may need a hard drive power splitter lead. Make sure you have one to hand.
- If you want any data from the original hard drive, back them up to floppies.
- Turn off the PC, and open up the case. The top half is connected to the bottom half by a blue and black wire which runs to the batteries. Halfway down this wire is a connector; unplug it to allow the halves to be separated completely.
- The hard and floppy drives are located at the front of the PC; the hard drive occupies a metal cage in the middle bay. Unscrew the retaining screws that hold the cage down, and lift the cage. The drive will be (or may be) connected to an LED at the front of the case, and to the power supply and its controller. Disconnect all the connectors and the cage should come out completely.
- Unscrew the screws at the bottom of the cage, and remove the original hard drive.
- If the controller for the old hard drive is still present in the PC, remove that as well.
- It's likely that the mounting holes on the 'new' SCSI hard drive won't be in the same place as they were on the old drive. To cure this, you'll need to drill some new holes in the sides of the drive cage. Use a 4mm bit to drill three holes (one should already be present). Make sure that when the drive is fitted in the cage, the circuit board on the bottom doesn't come into contact with the cage.
- Connect the SCSI cable to the drive - it should fit through the slot at the back of the cage. Also connect the drive power lead; if it won't reach, use a power splitter lead as an extension cable.
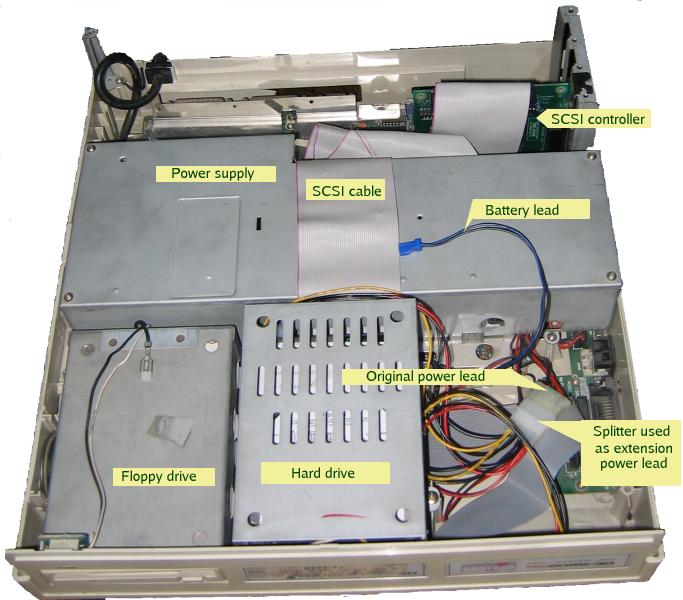
- Some SCSI hard drives have a connection on the front for an LED. If yours is one, then you can connect the LED on the front of the PC2086 to the LED connector on the drive. The PC should now look something like this.
- Screw the cage down. Make sure the SCSI cable from the drive lies flat on top of the power supply, and then put the top of the case back on (remembering to reconnect the lead to the batteries).
- Plug the SCSI controller into one of the expansion slots, and connect the cable to it.
- Turn the computer on and watch the BIOS messages. The SCSI controller should announce its presence and say that it's found a drive.
- If there was already a version of DOS on the drive, this will now start up. If not, you will have to install one. For drives bigger than 32Mb, you'll do better to install MS-DOS 5 or 6 (or DR-DOS) rather than the original MS-DOS 3.3; this is because MS-DOS 3.3 only supports hard drive partitions of 32Mb or less.
- To set up partitions, boot from a DOS floppy and type FDISK.
- If the drive is bigger than 2048Mb, you'll need to have multiple partitions.
- Once you have set up partitions, boot from the floppy again. Then type FORMAT C: /S. Once that has completed, the system should boot from its hard drive.
John Elliott 15 June 2004