When the Asus EeePC came out in the US on 1 Nov 2007, I ordered a White 4G from Newegg. After making many updates to the default Xandros Linux installation, I replaced it with a complete Ubuntu Gutsy (7.10) workstation install, then removed a few items (e.g. tracker, network-manager) that are either troublesome or not used. In the installation from an external USB DVD drive, I reformatted the SSD with two partitions; a 100MB ext2 (/boot) and the remainder as one large ext2 partition (/). No swap partition was created and both partitions were mounted with the 'noatime' option.
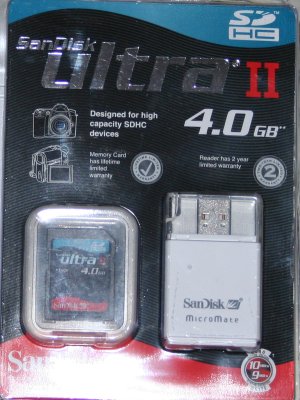
It was soon noted that the 1.7 GB of free space left on the SSD would limit some purposes for which I had envisioned the little bugger, so I scanned the various eee groups such as forum.eeeuser.com, and applied the vast array of hardware ideas to my needs. I wished to keep the main external connections (3 x USB and SDHC card reader) free, and wanted some storage method that would allow me to expand in the future. In one pre- Christmas sale, this SanDisk offering caught my eye:
While this is not one of the high-speed cards (10 MB/s read, 9 MB/s write), it should be more than adequate for /home. The entire on-board SSD is then available for the operating system and applications. This is a relatively simple project and builds directly on the work of others.
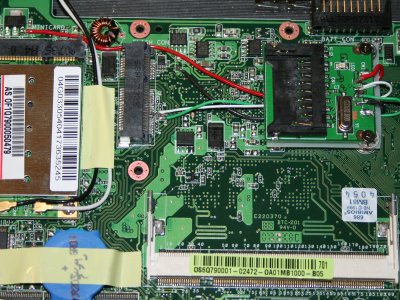
The first step is to remove the plastic case from the MicroMate USB2 Card Reader, and carefully unsolder the USB connector. Mounting the connector is very simple in the EeePC versions with the socket and mounting points for the expansion miniPCIe card, since two holes on the USB connector end of the adapter mate perfectly with the threaded standoffs on the motherboard. A small piece of teflon sheet was added for electrical insulation, and two lockwashers used to provide a slight space between the insulator and the IC on the adapter bottom. Finally, two "Eee-standard" screws (from a 4G that I "bricked" while developing this) secure the adapter in place. Standard USB color-coded wiring was used to make the connections. The bare mod:
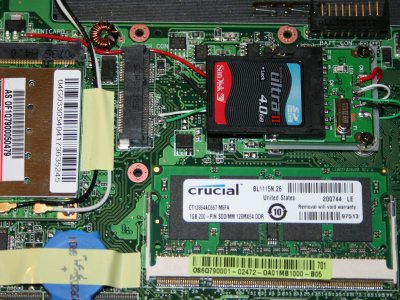
and with the SDHC card and replacement 1 GB RAM module installed:
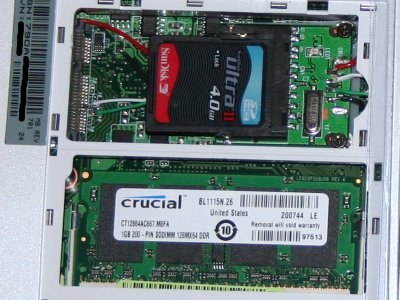
Finally, after testing, everything was put back together as:
The final step to make this work is to configure the card. When first powered up, the disk will appear as an additional drive automatically mounted to some mountpoint on the /media directory using the default FAT filesystem. With Ubuntu, the following steps were used:
1. See what device was allocated to your card by executing 'dmesg' in a terminal. In my case, 'sda' was the SSDD, 'sdb' was the built-in SD card reader since I had a card in place, and '/dev/sdc1' was used for the new SDHC card. If your unit appeared as a different device, update the steps below with your device.
2. Unmount the drive by right-clicking on the icon and selecting "unmount".
3. Partition the card as desired, defining the type as 'linux'. I used the commmand-line 'fdisk /dev/sdc' command (note no number since you are setting the main device partition). If your card has only one partition, this may be as simple as changing the partition type to '83' (linux), then saving the partition ('w') and exiting ('q').
4. Format the partition. If the drive was automatically re-mounted during the partitioning above, unmount it. Again, I used the command-line commands to format as ext3 as: 'mkfs.ext3 /dev/sdc1'. In this case, you need the partition number in the declaration.
5. Mount the partition. You can either 'sudo mount ..' the partition, or re-boot the system to make the newly-formatted partition to appear. When you see it, locate and record the 'UUID' for the next step. The easiest way to find it is by listing the directory contents of 'dev/disk/by-uuid'.
6. Examining the drive, you should have only a 'lost+found' file. I elected
to make the drive contain the entire /home tree, and preparation was simply
a matter of executing in a terminal; 'cp -rp /home /media/
7. Edit the file system table with 'sudo gedit /etc/fstab'. I added the following just before the lines for cdrom0 and floppy0 (replace 'your_UUID' with the actual string you saved in step 5 above):
UUID=your_UUID /home ext3 noatime,defaults 0 1
After saving the file and exiting, you are ready for business. On the next bootup, you will have more space available to the operating system, and a home directory limited only by the card size in the reader you added.
Enjoy!